
HOW TO REPLACE THE HEADBAND ON A BOSE A20 OR A10 (X)
The Bose A30, A20 and the older A10 (X) represents the upper echelon of noise cancelling aviation headsets. They are some of highest quality premium headsets available, however, over time, parts will need to replaced due to normal wear and tear. One such part is the headband.
If you are not sure which Bose aviation headset you have, use this photo to identify your headset.

Some of the most common issues that we've seen, are broken or cracked earcup holders (aka brackets or yokes) and broken microphones and of course the headband as mentioned earlier.
Replacing the headband on a Bose A20 or X is a fairly easy process that can be accomplished within 15 minutes. You will need a small Phillips head screwdriver for the 4 screws that secure the headband to the earcup brackets. In this example, we are using the Bose X but the same procedures will apply to the Bose A20.
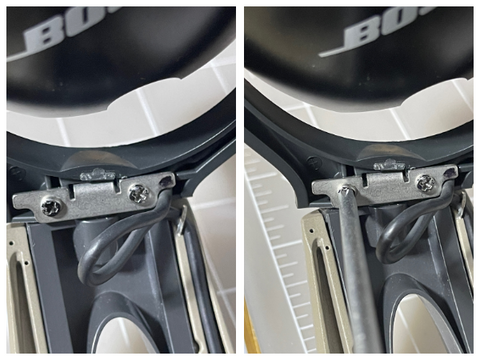
Step 1: Detach the down cable
The first step is to secure the headset on a work bench with clamps. Remove the headset cable assembly (down cable) from the headset. This will make the process much easier. This is accomplished by removing the two screws that secure the cable assembly to the headset.

Step 2: Remove the retaining clips
Once the cable assembly has been removed, use a pair needle nose pliers to remove the retaining clips that hold the earcup audio crossover cable to the headband. Be sure to remove the clips that are under the head cushion as well. Once all the clips are removed, the earcup wire can be gently lifted from the headband.

Step 3: Remove the earcup bracket
Use your Philips head screwdriver to remove the two screws from the metal plate that connects the headband to the earcup bracket. Repeat this step on the other side. Once you have removed all four screws, you can now gently detach the earcup bracket from the headband. You are now ready to install your new headband

Step 4: Put everything back together
To install the new headband, simply reverse the above steps on both sides. When putting the assembly back together be sure to thoroughly tighten the screws. Once you are done, reattach the down cable and test the fit.
#flysafe