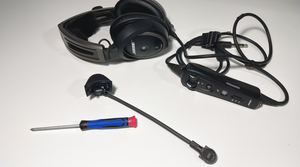
How to replace a Bose A20 Microphone
Over the years, we've gotten countless questions regarding instructions for replacing the microphone on the Bose A20 aviation headset. Replacing headset mic boom is a fairly easy process that can be accomplished within 5 to 10 minutes. Although this blog post will focus on the Bose A20, the procedure is the same for the Bose X (A10).
There are many reasons why a pilot may choose to replace headset mic boom on the Bose A20. The most common reason is due to a damaged microphone or faulty connection caused by a break in the microphone cable due to years of rotating the mic boom. Another reason a pilot may wish to replace the microphone could be that they want to switch from a low impedance 5 Ohms mic (commonly found on the military version of A20 with the U174 helicopter plug) to a high impedance electret mic so that the headset can be used in a G/A aircraft. If the reason is the latter, and the headset will be used in an aircraft with a G/A dual plug connection, then an adapter, such as the U174 to GA Adapter will also be needed. Alternatively, the U174 cable can be swapped out for a A20 twin plug cable.
To get started, you’ll need a small Phillips-head screwdriver and a replacement Bose OEM Electret microphone.
We can also install the microphone for you. To get started with our headset repair service, click HERE.
Step 1: Detach the down cable
The first step is to remove the headset cable assembly (down cable module) from the headset. This will make the process much easier. This is accomplished by removing the two screws that secure the cable assembly to the headset.
Step 2: Remove the housing cover
Once the cable assembly has been removed, you can now disassemble the microphone housing assembly and remove the cover. Again, just two screws.


Step 3: Unplug the old mic
In this step, you will gently unplug the mic cable (white connector) to remove the old microphone. Once this is done, you can now reverse the process and connect the new mic.

Step 4: Put everything back together
When putting the microphone assembly back together pay special attention to the polarity tab. The tab on the black connector should face outward or the controller/headset will not function correctly. Replace the microphone assembly cover and secure with two screws. Finally, reconnect the cable assembly to the headset and tighten the screws.

Congratulations! That's it, you're done. Now test everything out then go fly. As a special thank you for reading the blog, here is a coupon code for 7% off of a replacement microphone: A20MICBLOG03.
#flysafe

