HOW TO REPLACE A BOSE X HEADSET SPEAKER CROSSOVER CABLE
In this guide, we'll walk through replacing the ear cup speaker crossover cable on your Bose X headset. The crossover cable connects the left and right earcup speakers, allowing sound to travel between both sides. Over time, this cable may wear out or become damaged, causing intermittent or complete loss of sound in one or both earcups. Follow the steps below to complete this replacement at home at your convenience.
Parts & Tools Needed:
- Bose X ear cup speaker crossover cable
- Small Phillips-head screwdriver
- Needle nose pliers for removing clips
- Wire cutter for cutting the old cable
- Replacement headband cable retaining clips
- Optional replacement earcup rubber grommets
STEP 1: ACCESS THE EAR CUP SPEAKER CABLES
Begin by removing the ear cushion on the right earcup. Gently pull the cushion off the earcup rim; it should come off easily with moderate pressure. Next, remove the filter, and foam insert to reveal the internal components, including the speaker and crossover cable.

Note: For the Bose X, removing the ear cushion should expose both the speaker and the crossover cable’s connection points.
STEP 2: DISCONNECT THE OLD CROSSOVER CABLE
With the foam insert removed, locate the crossover cable attached to the circuit board. Use a small Phillips-head screwdriver to carefully loosen and remove the screw closest to the cable so that you can lift a small section of the copper shielding material that covers the circuit board and cable connector. Once you gain access to the connector you can gently disconnect it from the board. After disconnection, remove and discard the old cable. You may cut the old cable so that it is easier to remove.


STEP 3: INSTALL THE NEW CROSSOVER CABLE
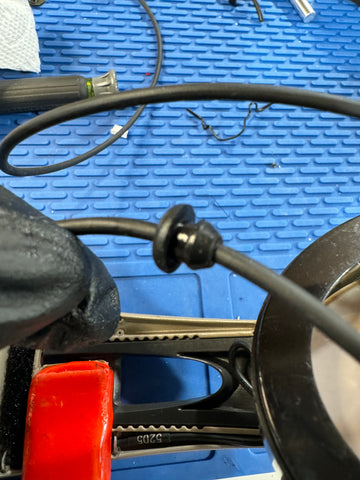
Remove the new crossover cable from its packaging. The cable will ship ready to install with the right connector preinstalled and the left connector removed to facilitate faster installation. Before you install the cable, use the needle nose pliers to gently remove the rubber grommet as shown below. This will make feeding the wires through the grommet much easier. Be especially careful not to break the rubber grommet while removing it. If the grommet breaks, you can find a replacement set here.


Starting with the right earcup, connect the preinstalled white connector to the earcup circuit board. Next, feed the other end of the wire (end without the connector) through the hole in the earcup and then through the rubber grommet starting from the pointy end. After you have fed the wires through the grommet, pull the cable through then reattach the grommet to the right earcup.


Pro Tip: If you are having difficulty pulling the cable through the grommet, use a small drop of Super Lube or other lubricant on the grommets so cable can slide through it easier.


STEP 4: ROUTE THE CABLE ACROSS THE HEADBAND
Once the right earcup speaker connection is secured, route the crossover cable along the headband to the left earcup. Remember to loop the cable in the key expansion areas as you saw on the original cable. Bose X headsets have small clips and channels along the headband designed to hold the cable in place. Secure the cable in these channels as you move it toward the left earcup.
STEP 5: CONNECT THE LEFT EAR CUP SPEAKER
After routing the cable across the headband, remove the ear seal cushion, foam insert and rubber grommet from the left earcup. Feed the wires and pull the cable through the rubber grommet (insert from the outside). Next, feed the wires through the hole in the earcup, this time from the outside in.


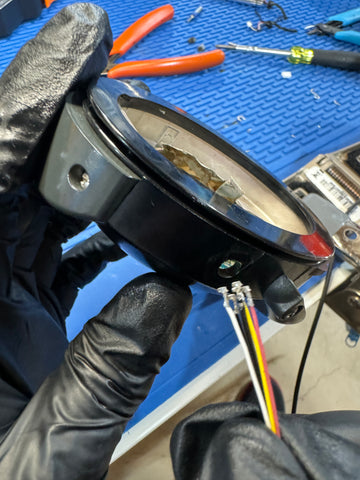
Once you have completed all of the above steps, attach the white connector to the cable and connect it to the circuit board. Connect the five wires to the connector in the following order:
- White
- Yellow
- Red
- Black (thin wire)
- Black (thicker wire)
This order is a little different from the right side so pay special attention to how you are connecting the wires to the connector.


STEP 6: REASSEMBLE YOUR HEADSET
Replace the foam inserts and gently press the ear cushions back onto both earcups. Be sure the cushions are seated evenly around the rim for a comfortable fit and optimal noise isolation. If you are unable to reuse the cable clips, you can order a set of replacement clips to keep the cable securely routed. To install the retaining clips you will need a small drop of superglue or epoxy on the tips of each clip to fasten them securely to the headband.
STEP 7: TEST YOUR REPAIR
Install batteries in your headset and connect it to an audio source to test both speakers. You should hear sound equally in both earcups. If you encounter any sound issues, double-check that all connections are secure and that the cable is undamaged.
TIPS FOR A SUCCESSFUL REPLACEMENT
- Keep track of the screws and clips, as they’re essential for securing the cable.
- Use only light pressure when tightening screws to avoid damaging the speaker pins.
- If the headset still has an audio issue after installation, the problem may lie elsewhere. Contact us if further troubleshooting is needed.
That's it! With your Bose X ear cup speaker crossover cable replaced, your headset should now provide balanced audio once again. If you need any assistance or prefer a professional repair, click [HERE] to learn more about our repair services.

