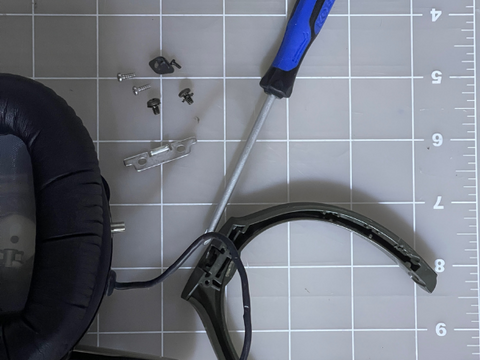
How to Replace The Earcup Holder Bracket on a Bose X Aviation Headset
The Bose A20 and the older Bose Aviation Headset X are some of the most desirable premium noise cancelling aviation headsets on the market today and outsell all other ANR aviation headsets by a wide margin. There is a good reason for this. Bose has always held a place at the top end of noise-canceling headsets, with a history dating back to 1989. They literally invented the segment and were one of the first to enter the market with a noise canceling aviation headset. Although the Bose A20 and X are some of highest quality premium headsets available, they are not without their fair share of problems. The Bose X was sold from 1998-2010 until it was replaced by the Bose A20. Although the Bose X is no longer supported by Bose, it remains a very popular headset.
If you are not sure which Bose aviation headset you have, use the photo below to identify your headset. Bose X headsets include all AHX models including AHX-32-01, AHX-32-02, AHX-32-03, AHX-32-04, AHX-32-05, and AHX-34-01. You can find your specific model by looking at the model number printed on the control module.

Some of the most serious issues that we've seen, and a bane for owners of Bose X ( A10) headsets, are broken or cracked earcup holders (aka brackets or yokes) and broken microphones. The earcup holder brackets on the Bose X tend to degrade over time and develop cracks and then fail completely requiring costly repairs. Broken earcup brackets are most often seen on the Bose X but rarely on the Bose A20 as Bose made significant improvements to this part when they introduced the A20 in 2010. The Bose A20 however does suffer from issues with the microphone.

Replacing the brackets on a Bose X is a fairly easy process that can be accomplished within 10-15 minutes. The main tools you will need are a small Phillips head screwdriver (such as a #1 head) for removing the 4 screws in each earcup, and a T5 Torx screwdriver for removing the wire retaining clip. If you do not have a T5 Torx screwdriver you may purchase one at any hardware store or you can improvise and use a small Philips #0 head screwdriver.
We can also perform this install for you. To get started with our headset repair service, click HERE.
Step 1: Detach the down cable
The first step is to secure the headset on a work bench with clamps and remove the headset cable assembly (down cable) from the headset. This will make the process much easier. This is accomplished by removing the two screws that secure the cable assembly to the headset.

Step 2: Remove the screws from each bracket
Once the cable assembly has been removed, use your #5 Torx screwdriver to remove one screw from the headset wire retaining clip. Next, use your #1 head Philips screwdriver to remove the two screws holding the earcup to the bracket (both sides) and then the other two screws that attaches the earcup bracket to the headband. Repeat this step on the other earcup.


Step 3: Remove the earcup bracket
Once you have removed all of the screws, you can now gently detach the earcup bracket from the headband. Follow these procedures on the other side then you'll be ready to install your new earcup bracket.


Our replacement Bose X earcup brackets are made in the USA by Hobbs Flyer using Carbon Fiber reinforced polymer, they offer the durability and strength not found on the originals. The kit contains both the left and right brackets.
Step 4: Put everything back together
To install the new earcup brackets, simply reverse the above steps on both sides. When putting the assembly back together be sure to thoroughly tighten the screws. Once you are done, reattach the down cable and test the fit.

Congratulations! That's it, you're done. As a special thank you for reading the blog, use coupon code: BOSEXREPAIRBLOG for 5% off a set of Bose X replacement earcup brackets.
#flysafe

